Showing posts with label Recipes. Show all posts

Friday, May 17, 2013

Canning Grapefruit Juice and New Kitchen Cabinets

My Mom had a bumper crop of the sweetest most delicious grapefruit this year.  More than we could possibly eat.  She shared many of them, but still had bushels of them left.  For some reason most people think they don't like grapefruit and say "No thank you".  I'm convinced it's because they've never had Louisiana tree ripened grapefruit.

My Mom wasn't sure what to do with them and was scared they were going to spoil.  So....I decided to try and can grapefruit juice.  I do love grapefruit.  I also love grapefruit juice.....but this juice really surpasses any grapefruit juice I've ever drank from a commercial canner.

So if you live in a citrus area and can get your hands on a bunch of citrus you can jar it using the following recipe.  I've only canned grapefruit and lemon.  There's never too many oranges and you can always give those away.

Canned Citrus Juice

You need:  Citrus fruit, sugar, sterilized canning jars, canning lids, and bands.  Large pot for juice and canning pot

Juice your fruit
Strain fruit through cheese cloth or clean curtain sheers
Place strained juice in large pot
Add 1/2 cup of sugar to grapefruit juice (not lemon) for each 12 pints of juice
Bring juice to just under a boil and simmer for five minutes

Fill sterilized jars 1/2 inch from top.
Wipe rims
Place warmed lids (warm  in hot water) on top
Screw bands down snugly

Place jars in pot of hot water
Jars should be covered by 1 to 2 inches of water
Bring water to a boil
Once boiling time each batch for 10 minutes
Remove from water
Allow to cool
Listen for seals to pop closed
Keep any jars that do not seal properly in Fridge and drink right away.


This is what my kitchen looks like currently.  Getting new cabinets today!  Will post pic.

Monday, January 14, 2013

Christmas Tea Party

This year I decided to give a Christmas Tea Party for the ladies in my family and my Father of course! He was the guest of honor!  What a blast we had!  I started early.  I wanted it to be the best tea party ever...So....I made everything that I could myself.  Even the smoked salmon!  (With help from Byron!)  I promised everyone I would post all the recipes (at the end of this post) and some pictures.  Hope you enjoy.  Maybe you'll be inspired to have one yourself next year, or maybe this spring?

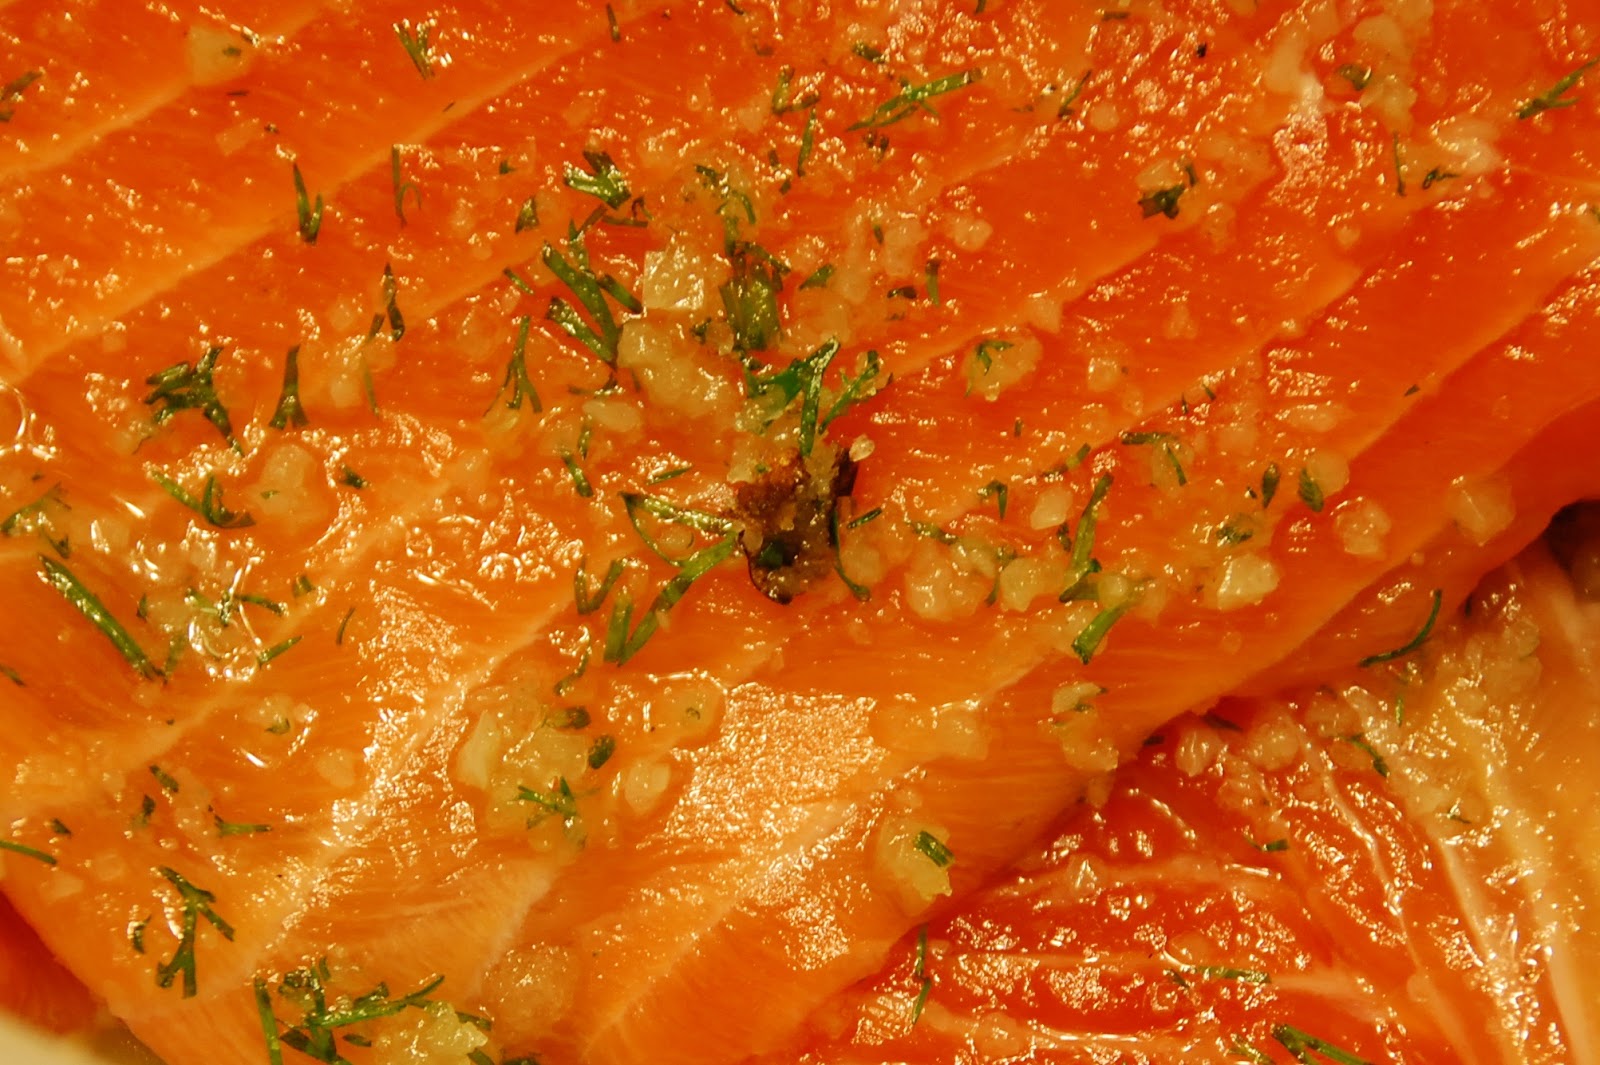
Here is the salmon covered in fresh dill (which there is plenty in the garden), juniper berries, sugar and sea salt.
I found these little baking cups.  They're adorable and really neat.  They stand up on their own and bake just like that...I like.
These are the holiday ones.  I also bought butterflies and cloud ones Spring?
Bambi is Byron's!  It's from one of his trips to Disney World as a child.  The little velvet deer is an old ornament of my Mother-In-Law's.  Prehaps from the 50's?  I didn't buy any decorations.  I love using what I have on hand in a different way to decorate and surprise people.
These are my shoes....Grand enough for the party I believe.

The coffee table set with Lemon Sour Cream Pound Cake, Strawberry Shortcakes, Peanut Butter Balls, Salmon Bites, and Roast Beef and Cucumber sandwiches.
Tiny Strawberry Shortcakes
 These Asparagus Sandwiches were the favorite and every single one was devoured.
The kitchen table with veggies, praline brie, date balls and sandwiches.  The floral arrangement was made from what I could find in the garden that was still presentable.  Flowers, pods and unique greenery!
Date scones with cream and lemon curd...the best!
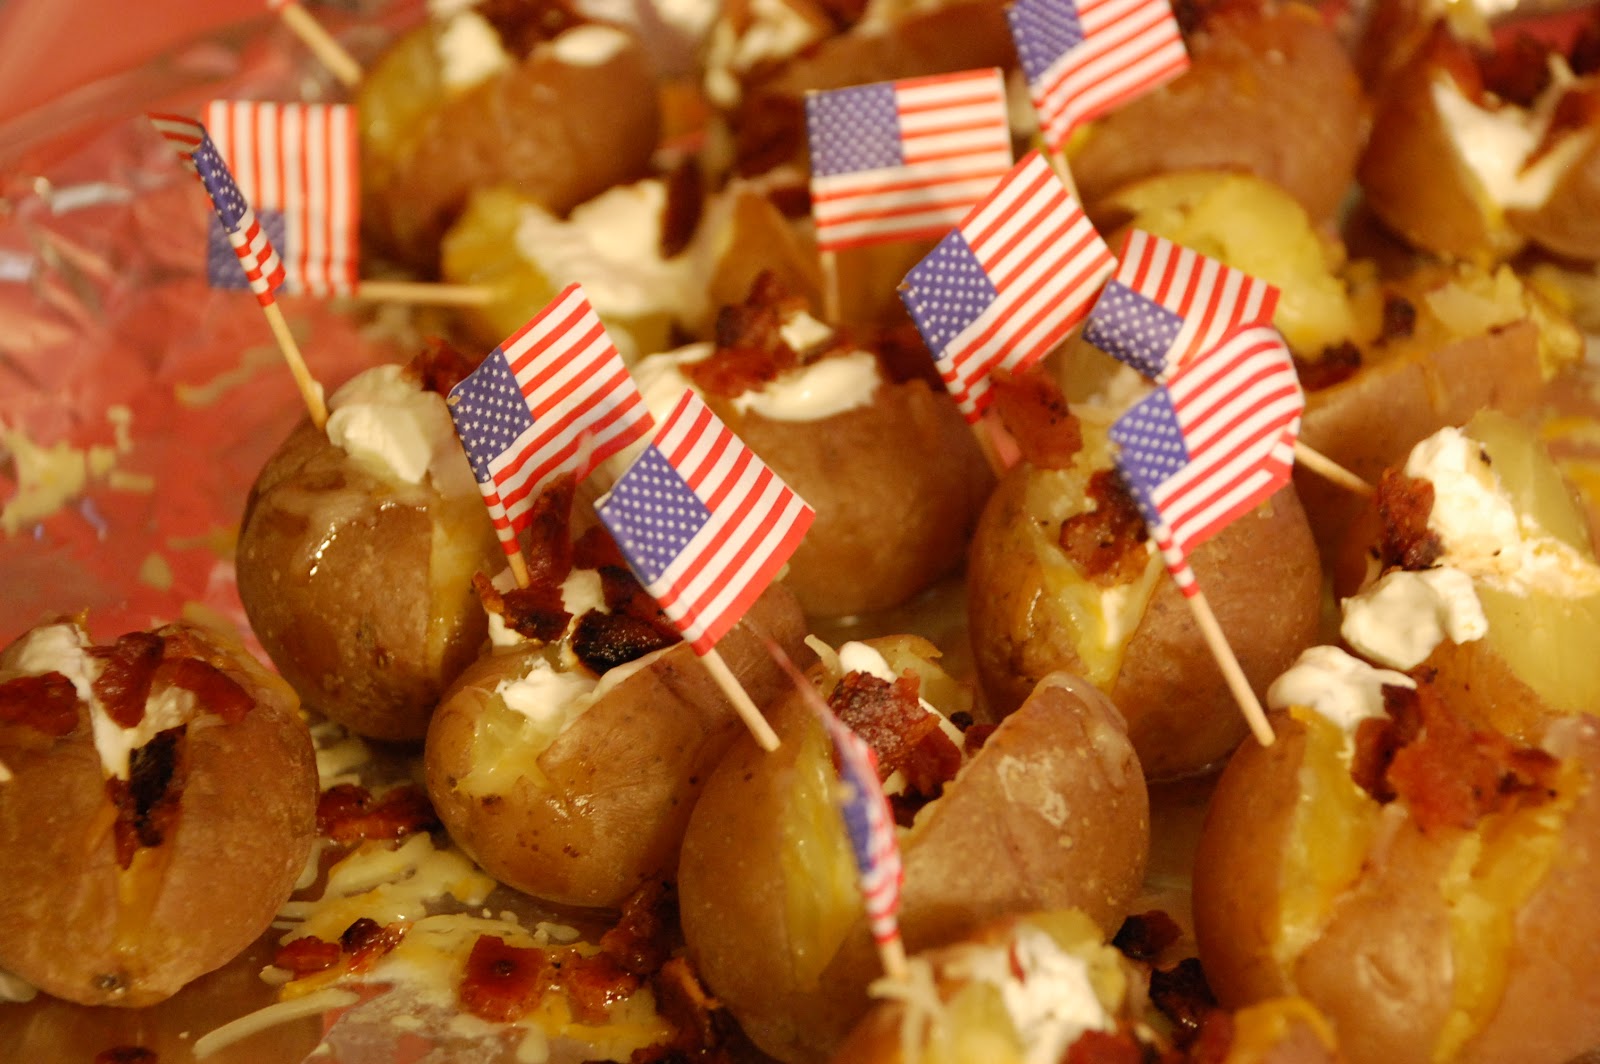
Tiny stuffed potatoes with a patriotic tribute.
Veggies all from the garden! 
 

Salmon Bites
 
Pumpernickel Bread
Smoked Salmon
Cream Cheese
Small Amount of Milk
Chopped Fresh Dill
 
Cut pumpernickel bread into small circles using a small cookie cutter (silver dollar size).  Mix cream cheese with a small amount of milk to make it a little softer.  Put cream cheese into cake decorating bag with a large tip (I use a really large tip.  The kind used for icing cupcakes).  Squeeze a flower of cream cheese onto each pumpernickel round.  Top with a few flakes of smoked salmon and sprinkle with fresh chopped dill.
 
I make my own smoked salmon.  I'll put that recipe in another post.  I like my own best!


Asparagus Sandwiches

White Bread
Mayonnaise
Fresh Asparagus Spears
Salt
Pepper
Lemon Juice
 
Cut tough ends off of asparagus.  Steam Asparagus.  Asparagus should still be on the crunchy side.  Cut crust off of bread and spread mayonnaise on one side.  Lay one steamed asparagus spear on slice of white bread mayo side up (of course).  Sprinkle salt, pepper and a little lemon juice on top.  Roll the spear up in the bread.  Yummier than you think.  These were everyones favorites.  You can also tie a ribbon of chives around the roll in a bow to make it fancy.


Strawberry Shortcake
 
6 oz of butter (room temp.)
1/4 cup plus two tblsp of sugar
3 eggs
1 1/2 cups of self rising flour
Straw Berry Jam
Strawberries hulled and cut into quarters
 
Whipped cream
(make your own with whipping cream, powdered sugar (add to taste) and a dash of cream of tartar.  Whip until soft peaks form.  Do not over whip!)
 
For the cake:  Preheat oven to 350 degrees.  Beat together butter and sugar in a large owl until pale and fluffy.  Beat in eggs one at a time.  Sift the flour into the mixture and fold in until thoroughly combined.
 
You can bake in an 8 inch pan (grease and base line with parchment) or into self standing paper baking cups.  Bake at 350 degrees for 20 to 25 minutes until golden brown and cake springs back lightly when touched.  Let cool completely.
 
Spread jam on top of cake.  For cup cakes use a melon baller to scoop out a small space in the center of each cake and fill with a dollop of jam.  Top cake with strawberries.  Put whipped cream in a cake decorators bag with large tip and cover top with whipped cream.  Add extra strawberries on top.  Do the same for each cup cake.  Put a couple of strawberry quarters on top of jam.  Give a nice squeeze of whipped cream on top.  Then put a quarter of a strawberry on top.  Sprigs of mint from the garden give it a nice garnish.  You can bake two cakes and make the cake a double layer if you wish with strawberries, jam and whipped cream between the layers as well as on top.


Peanut Butter Balls
 
2 cups creamy peanut butter
1/4 cup butter room temp.
1/4 tsp salt
1/2 tsp vanilla extract
2 cups confections sugar
Candy chocolate for dipping
 
Mix everything together thoroughly except the chocolate.  Put mixture in fridge and let cool.  Melt chocolate.  Roll mixture into balls and dip in chocolate.  Place on wax paper of foil and allow chocolate to harden.  Super yum.  You can also decorate with sugar crystals or splash with a contrasting color chocolate.


Date Balls
 
1 stick of butter
3/4 cup of sugar
1 pack or 8 oz. of chopped sugared dates
1 cup chopped pecans
1 cup crisped rice cereal
1 tsp. vanilla
Powdered Sugar for coating
 
In saucepan melt butter and sugar over low heat.  Add dates and cook 3 minutes and remove from heat.  Add vanilla and stir.  Add nuts and rice cereal.  Let cool a moment.  Hint:  butter hands to keep hot mixture from sticking to hands.  Roll into balls then roll in powdered sugar.  So yum.


Lemon Sour Cream Pound Cake
 
3 cups flour
1/2 teaspoon baking soda
1/2 teaspoon salt
1 cup (2 sticks) butter room temp
1/4 cup fresh lemon juice
1 tablespoon grated lemon peel
1 cup sour cream
 
Preheat oven to 325 degrees.  Grease 16 cup tube pan.  Dust with flour.
 
Sift flour,  baking soda and salt into a medium bowl.  Beat butter in large bowl at medium speed until fluffy.  Gradually add sugar and beat 5 minutes.  Add eggs 1 at a time beating just until combined.  Beat in lemon juice and peel.  Using spatula mix in dry ingredients.  Mix in sour cream.  Transfer batter to prepared pan.
 
Bake cake until tester inserted near center comes out clean.  About 1 hour 30 minutes.  Let cool completely then turn out onto platter.  You can make a glaze with powdered sugar, lemon juice and vanilla.
 

Praline Brie
 
1 1/2 cup brown sugar
1 stick of butter
2 tblsp of whipping cream
1 cup chopped pecans
1 small or medium round of brie
1 pack of freezer puff pastry (should have 2 sheets)
extra butter
1 egg
 
On a greased piece of foil on a baking pan (foil makes it easier to remove cooked brie later), score top of brie with knife.  Put several pats of butter on top.  Place brie on first sheet of puff pastry.  Place second sheet on top.  Cut away extra on top so that 2nd sheet just covers top.  Put aside scraps.  Bring up first sheet of pastry and bunch around edges to create a pleasing effect and completely cover brie.  Brush top with egg (not necessary but makes it shiny)  Bake in oven at 400 degrees until puff pastry is golden and done (about 20 to 25 minutes). 
 
About 10 minutes after brie is cooking, combine sugar, butter and pecans in pan.  Cook on low until sugar is completely dissolved.  Cook for a couple of minutes longer.  Add whipping cream cook a minute longer.  Slide cooked brie off of foil on to platter.  Pour praline sauce over brie.
 
This is best very fresh so serve immediately.
 
 
Date Scones
 
2 cups all-purpose flour
1tblsp baking powder
2 tblsp sugar
1/4 tsp salt
6 tbs butter
1/2 cup of sugared chopped dates
1 1/4 cup heavy whipping cream
egg for brushing top
large sugar crystals
 
Preheat oven 400 degrees.  I bake my scones on a silpat mat (love that thing worth purchasing).  In a large bowl, whisk together the flour, sugar, baking power and salt,  Cut the cold butter into small pieces and blend into the flour mixture with a pastry blender or your finger tips (I use fingers).  The mixture should look like coarse crumbs.  Add sugared dates.  Add whipping cream to the mixture.  Stir until just combined.  Do not over combine.  Add more cream to make it loose if needed.
 
Spoon mixture onto floured surface.  Knead dough gently (count to 10 DO NOT OVER KNEAD WILL MAKE TOUGH)  Pat into rectangular shape about 2 inches thick.  Cut in half long ways then into triangles.  Brush top with egg, sprinkle with sugar crystals.  Bake 15 to 20 minutes until lightly browned.
 
 
Cream for Scones
 
3 cups heavy whipping cream
1 cup powdered sugar
3 oz cream cheese
dash of cream of tartar
 
Beat cream cheese til smooth.  Set a side.  Use a chilled bowl.  Add heavy whipping cream and beat for 3 to 4 minutes (or more) until it starts to thicken a little.  Then add cream cheese slowly as you beat and add powder sugar and cream of tartar gradually.  Keep whipping until it thickens into soft peaks.  Do not over beat.
 
 
Lemon Curd
 
3 large eggs
1/3 cup fresh lemon juice
3/4 cup sugar
1 tblsp lemon zest
4 tblsp butter cut into small pieces
 
In pan on top of a  heat diffuser  (you can use a bowl placed in a pan with a couple of inches of water instead.)  Whisk together the eggs, sugar and lemon juice until blended.  Cook (on medium) stirring constantly to prevent curdling until the mixture becomes thick like sour cream or hollandaise sauce.  Will take about 10 minutes.  Remove from heat and pour through a fine sieve to remove any lumps.  Stir in butter until melted and thoroughly mixed.  Stir in lemon zest.  Zest is optional.  Cover so skin doesn't form.  Let cool and refrigerate.  Will keep up to two weeks.  Makes 1 1/2 cups.
 
This isn't every recipe and I may have typed in a mistake in my hurry.  So let me know if you would like another recipe or have any questions regarding these recipes.

Monday, December 17, 2012

Getting Ready For Christmas & Around The House and Gardens & Red Beans and Rice Recipe

Long Title = Long Post

I'm finished shopping and now I'm doing a little decorating. Getting ready for a tea I'm having this Saturday for the ladies and girls in my family. It's exciting.   I'm reusing my decorations from past years and adding in a few natural items such as feathers and pine cones along with a generous sprinkling of glitter.  When in doubt...add glitter!  I painted "Merry Christmas" on the mirror with a little acrylic paint.  I'm sure it'll scrape off just fine with a razor blade. 

The mirror is actually an old dresser mirror I saved from a friend who was throwing it out for his mother.  I turned it sideways and painted white first.  When I tired of that I gave it a refreshing coat of glittery gold copper paint!

I also plan on making some fun things for the tea...will post on those later as well.
I love my Carruth Studios Nativity Stone....as well as my lovely handmade angels.   We had so much fun making them in Sunday School.  I teach the 10, 11 and 12 year olds.  My favorite group to teach!  So my Nativity has it's very own host of heavenly beings!
I draped one of my roosters lovely tail feathers over the top to frame it softly!  Just like a loving hug...Sigh....
Hee Hee....Looks as if one angel is in trouble!
My cat and my dog pooped out on me while wrapping presents.  Flossie made herself comfy on top of one of the wrapped gifts.  Delta is comfortable as long as the cat's sleeping!
I've been picking so much from the garden.  The row of red beans I planted (you may remember) way back is picked and shelled.  I was concerned that it may not have time to finish before the coldest weather hit.  We've had a few nights below 40 but the beans and the tomatoes held on!  The largest plumpest ones I put in the white colander.  The ones that started to dry I put in the silver.  I'm going to cook the plump ones.  They are amazing.  So much better than dried and dried's pretty good.

I'm also harvesting: carrots, cauliflower, cabbage, beets, collards, turnips, mustard, Lima bean, broccoli....hmmm...oh yes cilantro, green onion, Roselle, dill, rosemary....that's about it right now.

I'm planting additional kale, cabbage,  and broccoli (transplants), and beets and lettuce (seed) right now.
I spread the remaining beans on a pan to dry.
Pretty.  Very pretty.  I love to feel them.
The plump ones I cooked in a crock pot....since I'd be out shopping all day....Yum
Red Beans
 
(I cook from sight so these are all approximates)
Onions (about 1/2 cup)
Garlic (about 3 to 4 cloves)
Bell Peppers  (about 1/2 cup)
Celery (about 1/2 cup)
Green Onions (about 2)
small bunch of parsley
Salt to taste
Pepper to taste
Dried Red Pepper (I use the ones I grow)
Oil (I use olive)
Red Beans (3/4 to 1 lb)
Smoked Sausage
 
Chop up all the seasonings.  Saute seasonings in oil until tender.  Add to pot with beans and water (or stock).  Cover the beans about 1 inch.  If cooking on the stove you may have to add water or stock as needed.  Salt and pepper and crumble in dried red pepper (or flakes or ground).  Cut sausage into links fry a little while in the pan.  Add to pot of beans and simmer beans until done.  They should be creamy!  Serve over rice.  I like medium grain brown rice or short grain will do too.
 
Some people put a stick of butter in their beans.  They claim it makes them creamy.  Not sure on this.  I'm not inclined to try it personally.  You can also throw in tasso, ham, a ham bone (whenever we have a whole ham I always save the bone for red beans), salt pork...hmmm I'm sure there is something else I've missed that some of the elders do.  They throw most everything in there.
 
If you have a variation I'd love to know!
 
Here's a picture my daughter took of me holding a cabbage and some carrots I grew.  She thought the cabbage looked like a wedding bouquet.  Lovely hand hmmm?

Roasted beets and carrots with olive oil, rosemary, thyme, salt, cracked pepper, and balsamic vinegar.  I boiled the carrots and beets first (separately) to make them tender.  Yum.

Friday, June 15, 2012

Just a Note on Gardening During Our Hot Louisiana Summers...


...really just a note. If you find your garden being devoured by bugs....well it's just Louisiana. Don't despair..and think that your a gardening failure!  I find that June, July and August are our worst possible gardening months. The pests, the heat, the humidity...well not a very good combination for growing much. I find this year that our very mild winter left plenty bugs alive and kicking to cause havoc this summer....and they are.

...but don't be dismayed....there are some things that seem to love and if not love at least live and keep producing in oppressive rainfalls and heat...Okra, eggplant, peppers, and melons. Although all of these do like their feet dry. So try and put them in a raised bed or spot if possible and give them a little breathing room to let the moisture dissipate.

I make my girls a yummy summer snack they devour....yep and it's okra. Not slimy okra, but crunchy okra.

Crispy fried okra:

okra (what ever ya got in the garden)
1 cup corn flour
1 cup flour

Mix flours together. Cut okra into 1/4 inch rounds. Put in bowl and stir to get it's natural stickiness all over it. Place okra in flour mixture and stir. Then place okra in sieve and shake out excess flour. Deep fry until light brown and crispy. Drain well on paper towels and sprinkle lightly with sea salt.

Eggplant

You can fry eggplant too. Just peel and slice eggplant in rounds. I add a little creole seasoning. Dip in egg and milk (whipped together) then coat with the corn and wheat flour mixture. I call this the Mississippi style of frying eggplant. If you want Italian fried eggplant for eggplant Parmesan...coat with Italian breadcrumbs before frying instead of the corn and wheat flour.

...and peppers....well there are a million things you can do with peppers. I chop them up and use them when cooking all the time. I dry the extras and save them for winter. I roast some...you can stuff them and bake or fill them full of cheese coat with batter and deep fry....

....my favorite are the melons...and bugs, I am keeping a close eye on you...you can't have the melons!  The water melons are growing nicely.   Some are close to 10 lbs already!  I have moon and stars and orange glow varieties.  I also have a few large banana melons getting close to maturity...beautiful.

Thursday, May 31, 2012

Sewing Lately & Zucchini Muffins

My husband spied a 1958 electric Singer sewing machine in the back of a flea market in Columbia Mississippi.   He thought it was amazingly cool....I thought it would just be a hunk of cool junk to take up precious space in my home.
Byron cleaned it up and oiled it....and unbelievably it works charmingly!  No actually wonderfully!  I'm in love with it now.  I broke two machines previously trying to hem Byron's jeans....this machine went straight through three layers of jean material without even hesitating!  I am so impressed....It looks really cool as well.  This machine is 54 years old and has been stored Lord knows where and it still works....I'm working on my third modern machine in the past 10 years!
Here's my most recent plastic machine purchase...and this is the heavy duty one.  It is a little fancier and does some stitches the other doesn't, so for light work I still use this one.  I'm more familiar with it as well.  Lately I've been on an apron sewing kick.  I made one for my friend Christy for her college graduation and five other ones to sell for my daughters to make money to go Peak.  It's a youth meeting for our church affiliation.  I've sold them all.  I'm thinking about making more.  I sold them for $22.00.  I think that's a pretty cool price.  I may post future ones on my site to see if anyone is interested.  You may remember me posting about this 1920's apron pattern from Amy Barickman's book "Vintage Notions".

This is by far my favorite way to store thread.  It is so convenient  to look in and easily see what thread you need.  I use a little tape to secure the thread to the top of the spool if it doesn't have one of those cool tops that pop up a little to wrap and secure the thread under.
Here are five of the aprons I did.  I tried to choose really cool or vintagy fabrics.  The roses seemed to be everyones favorite.
I love these things!
I've also been crocheting edging onto cool flannels for baby blankies.  They're on the large side so I guess they could be used as lap blankies as well.  Thinking of selling these as well.  I crochet or knit in the car when my husband is driving.  That way I don't feel so useless or keep annoying my husband by shrieking and gasping at what I consider dangerous driving!  New Orleans during rush hour can be pretty bad.
Made zucchini date muffins with all the extra zucchini.  They were yum!  I'll post the recipe soon.
Also this is the best red beans and rice I have ever eaten (this is the beginning stages of cooking it...would you like that recipe too?)  Thanks to my neighbors.  They planted plain old Camellia red beans.  This is what came up.  Amazing yummy beans....much much better than the dried ones....So amazingly better.

Recent harvest!  I've had to pick the tomatoes green to keep the bugs from hauling them off!

Wednesday, December 14, 2011

My Arm Hurts & Around The House and Gardens & Spicy Pecan Recipe

My arm hurts from standing on a six foot ladder and finally finishing the sky on my living room ceiling.  Next I'm adding a reproduction of the "Creation of Adam" from the Sistine Chapel surrounded by a migration of monarch butterflies...and I'll lie on my couch and enjoy...

sigh not really....I'll probably add a few monarchs flitting about and call it finished finally!  Must say it's worth the deltoid pain...I do like to lie on my sofa and stare up at my "sky" ceiling...
Yesterday as I rushed to Tera's violin lessons I realized...oops!...last lesson before Christmas and no good tidings of joyous gifts to bring...

hmmm...ran back in grabbed a bag and filled it with turnips, mustards, collards, carrots and a head of lettuce....good tidings of joy!  Before I left lessons that night Tera's teacher's wife came in smiling with a tray of cut up seasoned veggies ready for roasting and explanation of what she planned to do with the rest of  the veggies the next day.  I'm still smiling!

I'm also still getting a crop of figs....unbelievable...even with the cold weather the "Alma" variety of fig is still bearing.  Duly impressed....
...I think turnips are lovely....they make me smile....
...with a light frost blanket I've been able to hobble more tomatoes from my large bush.  This vine is still covered with tomatoes in various stages of ripeness.  I pick them as soon as I see a hint of red and let them ripen inside...just in case....
When my Mom-In-Law cleaned out her home we found these cool old ornaments.  I haven't really decorated for Christmas yet.  The girls and I are going to make some natural decorations once they get out of school....but ....I love these old ornaments.  My M.I.L.  thinks she bought them when my husband was small at Audubon Park and Zoo in New Orleans.

Cute little crossed eyed tiger and patient adoring sweet deer....
...mischievous kitty...
...fun loving piggy....with giant overlord bird....
....not disease carrying mouse (unlike the ones currently partying in my attic) with still fresh plastic holly....
...and surprised looking angel with deer herd...
...this is a gift I'm working on....will post when finished.  It's a very easy baby blanket...that is if you can crochet and if you can't....learn!....it's easy too.   Just cut two pieces of groovy flannel the same size (baby blanket size)...put the back sides together and pin....blanket stitch the edges together using crochet thread (size 10)....my tiny steel crochet needle goes through the flannel with little difficulty...do a triple chain stitch around that and then finish with a shell stitch to make it lacy!  I like to use stitches without large openings to keep baby fingers and things from getting caught.  Will post when finished.  But don't you just love these groovy prints....they're from a line called Urban Flannels.

Now here is a spicy pecan recipe for all my garden club friends.  I got it from Martha Stewart's Christmas Cookbook.  Luckily it's simple for Martha.  I didn't have to travel or rob anyone to get the ingredients.

Spicy Pecans

1 tblsp coarse salt
2 tblsp cayenne pepper
1 1/2 tsp paprika
1/2 cup sugar
2 large egg whites
5 cups pecan halves

Preheat oven to 300 degrees F.
Line 2 baking sheets with parchment paper.
Combine salt, cayenne, paprika and sugar.
whisk egg whites until foamy.
whisk in spice mixture.
stir in pecans and coat well
spread on baking sheets
bake 15 minutes
reduce heat to 250 degrees F.
Rotate sheets in oven and cook until nuts are browned and fragrant about 10 minutes more.
Transfer to another sheet of parchment and let cool
Yum and addictive!

Tuesday, October 25, 2011

Yummiest Blue Berry Pie Recipe Ever and Recent Wedding

My sister NeeKee gave me this recipe for blueberry pie and it's the bestest ever!!!  Everyone adores this pie...some people even steal it from funerals (snicker...Miss Riya!)....

Blue Berry Pie

1 pie crust
1 1/2 cups frozen Blue Berries
1 stick melted butter
1 egg
1 cup sugar
1 tsp. vanilla
1/3 cup all purpose flour

Put blue berries in crust.  Mix all other ingredients, pour on top and bake 1 hour at 350 degrees!
Wow that's easy!  But more yummy than easy!

Pictures from the recent wedding I did at the New Orleans Botanical Gardens....such a lovely night....the wedding was perfect!